![Baleno[2022-2026]](http://gearguard.in/cdn/shop/files/Baleno_2022-2026.png?v=1777635789&width=200)
![Brezza[2022-2026]](http://gearguard.in/cdn/shop/files/Brezza_2022-2026.png?v=1777637174&width=200)
![Creta[2024-2026]](http://gearguard.in/cdn/shop/files/Creta_2024-2026.png?v=1777713717&width=200)
![Exter[2023-2026]](http://gearguard.in/cdn/shop/files/Exter.png?v=1777645484&width=200)
![Fortuner[2021-2026]](http://gearguard.in/cdn/shop/files/Legender.png?v=1778747602&width=200)
![Fronx[2023-2026]](http://gearguard.in/cdn/shop/files/Fronx_2023-2026.png?v=1777638905&width=200)
![Hycross[2023-2026]](http://gearguard.in/cdn/shop/files/Hycross_2023-2026.jpg?v=1777557791&width=200)
![Nexon[2023-2026]](http://gearguard.in/cdn/shop/files/Nexon_2023-2026.png?v=1777635665&width=200)
![Punch[2026]](http://gearguard.in/cdn/shop/files/Punch_2026.png?v=1777630802&width=200)
![Punch EV[2026]](http://gearguard.in/cdn/shop/files/Punch_EV.png?v=1777630147&width=200)
![Scorpio N[2022-2026]](http://gearguard.in/cdn/shop/files/Scorpio_N_96b71b0a-5d36-4f8e-a41b-3f5fc39c0831.png?v=1777642812&width=200)

![Seltos [2026]](http://gearguard.in/cdn/shop/files/Seltos_2026.png?v=1778675640&width=200)
![Sierra[2025-2026]](http://gearguard.in/cdn/shop/files/Sierra_0db54e3f-e999-45ae-8ef1-f06b6e28199b.png?v=1777627108&width=200)
![Thar Roxx[2024-2026]](http://gearguard.in/cdn/shop/files/Roxx.png?v=1777639012&width=200)
![Venue [2025-2026]](http://gearguard.in/cdn/shop/files/VEnue_2025-2026.png?v=1777710547&width=200)
![Victoris[2025-2026]](http://gearguard.in/cdn/shop/files/Victoris_04f492a2-b2db-4773-bb1b-370ce591512a.png?v=1778681431&width=200)
![Windsor[2024-2026]](http://gearguard.in/cdn/shop/files/Windsor_2024-2026.png?v=1777647916&width=200)
![XEV 9E[2024-2026]](http://gearguard.in/cdn/shop/files/XEV_9e.png?v=1777542858&width=200)
![XEV 9S[2025-2026]](http://gearguard.in/cdn/shop/files/9S.png?v=1777642627&width=200)
![XUV 7XO[2026]](http://gearguard.in/cdn/shop/files/XUv_7Xo_image.png?v=1777475598&width=200)


Installation guides
How to apply your Gear Guard
Pick your product, watch the video, and you're done in minutes. Every kit ships with everything you need.
Infotainment screen guard
4 minsEasyWorks the same for all 210+ car models. Watch the main video, or pick your car-specific guide.
Step-by-step with photos
Clean the screen
Use the wet wipe first, then the dry one. Get every corner.
Dust sticker pass
Dab the dust removal sticker over the whole screen. One speck of dust = one bubble.
Align, peel and lay
Line up with the screen edges before peeling. Lay from one side like a hinge.
Squeegee outward
Push bubbles from the centre to the edges with the included squeegee.
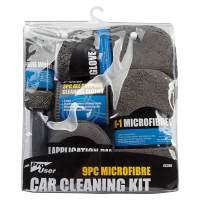
What's in the box
Avoid these mistakes
- Don't install in direct sunlight — heat ruins the adhesive spread
- Don't install with AC blower on — it pushes dust onto the screen
- Don't peel the full backing at once — use the hinge method
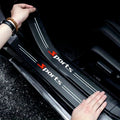
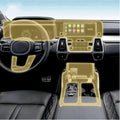
Interior pre-cut PPF
15–20 minsModeratePre-cut for your exact car model — no trimming needed. Take your time on the curved panels.
Step-by-step with photos
Clean the panel
Wipe each panel with the wet wipe. Remove all polish or dressing residue.
Match the piece
Each piece is labelled. Dry-fit it on the panel before peeling.
Peel and place
Peel a third of the backing, anchor one edge, then work across slowly.
What's in the box
Avoid these mistakes
- Don't rush curved panels — slow placement prevents lifting edges
- Don't stretch the film to fit — it's pre-cut to exact size
- Don't touch the adhesive side with bare fingers
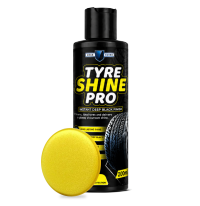
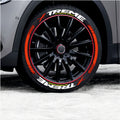
Permanent Tyre Stickers
20-30 MinsModerateAchieve a factory-finish look with your tyre stickers. Follow the installation process carefully for maximum adhesion and long-lasting performance.
Step-by-step with photos
Step 1: Clean the Tyre
Wash the tyre sidewall thoroughly and remove all dirt, grease, tyre shine, and contaminants. Allow the surface to dry completely.
Step 2: Sand the Surface
Lightly sand the application area using the provided sand paper. Wipe away any dust after sanding.
Step 3: Apply the Stickers
Apply a thin layer of adhesive to the back of each letter and carefully position it on the tyre. Press firmly for 20–30 seconds.
Step 4: Let It Cure
Allow the adhesive to cure for at least 24 hours before driving or washing the tyres.
What's in the box
Avoid these mistakes
- Applying on dirty or oily tyres
- Skipping the sanding process
- Using excessive adhesive
- Driving immediately after installation
- Washing tyres before adhesive fully cures
- Applying stickers on wet surfaces
- Incorrect letter alignment and spacing
Laptop Screen Guard Installation
5 minsEasyProtect your laptop display from scratches, smudges, and daily wear. Follow these simple steps for a bubble-free installation.
Step-by-step with photos
Step 1: Clean the Screen
Use the wet wipe and microfiber cloth to thoroughly clean the display. Remove all fingerprints, dust, and smudges
Step 2: Remove Remaining Dust
Use the dust removal sticker to lift any remaining dust particles from the screen.
Step 3: Align & Apply
Peel off the protective backing, carefully align the screen protector with the display, and gently place it onto the screen.
Step 4: Smooth Out Bubbles
Press from the center outward using the microfiber cloth to remove any air bubbles and ensure a perfect finish.
What's in the box
Avoid these mistakes
- Installing in a dusty environment
- Touching the adhesive side
- Skipping dust removal
- Misaligning the protector before application
- Applying excessive pressure during installation